How to Make Watermelon Ice Cream with Just Watermelon and Coconut Milk

A frozen watermelon half can turn into the easiest “ice cream” bowl you’ll make all summer, no churn, no machine, no complicated base. You freeze the fruit, pour in creamy coconut milk, then scrape everything together with a sturdy metal spoon until it looks like pink, scoopable shaved ice cream.
The best part is how playful it feels. You’re not blending, straining, measuring five different sweeteners, or washing a pile of dishes. The watermelon becomes the bowl, the frozen fruit becomes the dessert, and the coconut milk adds that creamy finish.
This is the kind of treat you can make when watermelon is taking over the fridge and everyone wants something cold after dinner. It’s light, refreshing, messy in a fun way, and shockingly satisfying for something made with just two ingredients.

Why this watermelon ice cream works so well
Watermelon is mostly water, which sounds like it would freeze into a hard brick. And it does, if you just throw it in the freezer and try to bite into it later.
The trick is what you do after it freezes.
When you scrape frozen watermelon with a metal spoon, the spoon shaves off thin, icy flakes of fruit. Those flakes soften quickly and mix with coconut milk, turning into something between sorbet, granita, and creamy shaved ice. Call it watermelon ice cream, watermelon snow, or frozen watermelon cream. The name matters less than the first cold, juicy bite.
Coconut milk brings richness. Watermelon brings natural sweetness and a clean, fresh flavor. Together, they make a dessert that tastes creamy without feeling heavy.
You’ll want to use full-fat coconut milk if you want the richest texture. Lighter coconut milk still works, but the result will feel more icy and less creamy. If you’re not avoiding dairy, sour cream can also work in the same style. It gives the dessert a tangy, almost frozen yogurt-like flavor. For this version, though, we’re keeping it simple with watermelon and coconut milk.
What you’ll need
You only need a few things, and most of them are tools rather than ingredients.
Ingredients
1 watermelon
A small to medium seedless watermelon is easiest to handle. A big one works too, but it gets heavy once frozen.
Coconut milk
Use enough to fill the carved indentation in the watermelon half. For most watermelons, that’s about 1/2 to 1 cup.
That’s it. No added sugar, no cream, no eggs, no blender.
If your watermelon isn’t very sweet, the finished dessert will be less sweet too. This recipe depends on the fruit, so pick a watermelon that feels heavy for its size and has a creamy yellow field spot. Those are usually good signs.
Tools
A large sharp knife
A sturdy cutting board
A spoon for carving
Plastic wrap or freezer-safe wrap
A large bowl
A metal spoon for scraping
Oven gloves, clean kitchen gloves, or a thick towel
That metal spoon deserves its own little spotlight. A regular metal tablespoon works, but a strong serving spoon can be even better. You want something firm enough to dig into the frozen fruit without bending.

Before you start, make room in the freezer
This is the one step that saves you from freezer frustration later.
Watermelon halves are awkward. They’re round, juicy, and not exactly built for stacking next to frozen vegetables. Before you cut anything, clear a flat space in your freezer where the watermelon can sit level.
If your freezer has a drawer, check the height. If the watermelon half is too tall, you can trim a small slice from the rounded rind side so it sits flatter. Don’t cut deep enough to expose the flesh on the bottom, or juice may leak.
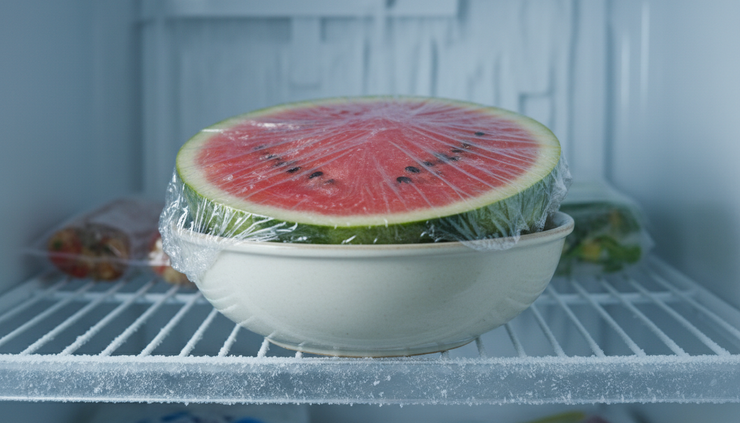
You can also set the wrapped watermelon half in a bowl before freezing. This helps keep it steady, especially if your freezer shelf is wire or slightly uneven.
Just make sure the bowl is freezer-safe and large enough to hold the watermelon without tipping.
Step 1. Cut the watermelon in half crosswise
Place the watermelon on a sturdy cutting board. If it rolls, tuck a towel under one side to steady it.
Cut it in half crosswise, not lengthwise. You’re cutting through the middle so you end up with two round bowl-like halves. This shape makes the finished dessert easier to scrape and serve.
Take your time here. Watermelons can be slippery, so keep one hand on top and cut with slow, confident pressure. If the watermelon is very large, it may help to start the cut, rotate the fruit, and continue cutting around the center until the knife meets the first slice.
Once it’s cut, choose the half that sits most evenly. That will be your ice cream bowl.
You can use the other half for snacking, blending into drinks, or making a second batch.
Step 2. Carve an indentation for the coconut milk
Use a spoon to carve a shallow indentation in the center of one watermelon half. You’re not hollowing out the entire melon. You’re just making a little well where the coconut milk can sit.
Think of it like making a small pool in the fruit.
Scrape out a few spoonfuls from the center, eating them as a cook’s snack if you want. The indentation should be wide enough to hold the coconut milk, but not so deep that you weaken the bottom of the watermelon.
Pour the coconut milk into the well. It’s okay if some of it spreads into the watermelon flesh. That’s actually a good thing. As it freezes, the coconut milk settles into little pockets and creates creamy streaks when you scrape later.
If the coconut milk has separated in the can or container, stir it until smooth before pouring. You want the creamy part and liquid part mixed together.
Step 3. Wrap and freeze until solid
Wrap the watermelon half tightly. Press the wrap over the cut surface, then cover the sides as well. The goal is to protect the fruit from freezer smells and help prevent icy buildup on top.
Place the wrapped watermelon in a bowl for stability, then move it to the freezer.
Freeze until solid. This usually means several hours, and overnight is the easiest plan. The center should feel firm, and the coconut milk should be completely frozen.
Don’t rush this part. If the watermelon is only partially frozen, it won’t scrape into fluffy flakes. It’ll mash and slush instead. Still tasty, yes, but not the texture we’re after.
Step 4. Let it soften slightly at room temperature
Once the watermelon is frozen solid, take it out and let it sit at room temperature for a short time. You don’t want it melted. You just want the surface to loosen enough that your spoon can scrape it.
Start checking after about 10 minutes. A very large watermelon may need closer to 15 or 20 minutes, depending on your kitchen temperature.
This softening time makes a big difference. If you try to scrape it straight from the freezer, it may be too hard, and the spoon can slip. If you wait too long, the fruit gets watery. The sweet spot is when the surface is still frozen, but your spoon can shave thin layers from the top.
Place the watermelon in a large bowl before you start scraping. This keeps it from rolling around and catches any drips. It also makes the whole process feel less chaotic, which is helpful once your hands are cold and the watermelon starts to glisten.
The scraping step is where the magic happens
Now grab your metal spoon.
This is the most important part of the whole recipe. Don’t use a plastic spoon. Don’t use a flimsy utensil. A metal spoon gives you the firm edge you need to scrape the frozen watermelon into fine, snowy flakes.
Hold the watermelon steady with one hand and scrape across the frozen surface with the spoon. Use short strokes at first. You’ll see bright pink shavings curl up, sometimes with creamy white streaks from the coconut milk.
Keep scraping and folding the shavings into the coconut milk as you go. The texture will start icy, then turn softer and creamier as the flakes mix with the fat in the coconut milk.
If your spoon stops gliding and starts bouncing off the surface, let the watermelon sit for another few minutes. If it starts melting too much, put it back in the freezer for a short reset.
This isn’t a race. Scraping is part of the fun.
How to keep your hands from freezing
Frozen watermelon is cold in a very direct way. The rind can chill your fingers fast, especially if you’re holding it steady while scraping.
A few simple tricks help:
Use oven gloves
They give you grip and insulation, especially when handling the watermelon right out of the freezer.
Wrap the rind in a towel
A clean kitchen towel makes the frozen half easier to hold and keeps your hand from getting numb.
Set it in a bowl
This is the easiest fix. A bowl supports the watermelon so you don’t have to grip it as tightly.
Take breaks
If your hand gets too cold, stop for a minute. The dessert will still be there.
A wide mixing bowl is especially helpful because it holds the watermelon securely while giving you room to scrape. If the bowl is too small, the watermelon may wobble. If it’s too shallow, it may slide. Go for something deep enough to cradle the rind.
Serving ideas that keep it simple
You can eat this straight from the watermelon half, which is honestly the most fun way. Hand everyone a spoon and let them scrape their own section.
If you want a neater dessert, scrape a pile into small bowls and serve it right away. The texture is best when it’s freshly scraped, cold, and fluffy.
A few easy serving ideas:
Scoop it into chilled bowls for a cleaner presentation.
Serve it after a cookout as a cold, light dessert.
Make it in the afternoon, then scrape it after dinner.
Use a smaller watermelon for a two-person treat.
Freeze both halves if you’re feeding a group.
If you use sour cream instead of coconut milk, the flavor turns tangier. It’s delicious, but it won’t be dairy-free. Coconut milk gives the smoothest two-ingredient version and matches the fresh watermelon flavor beautifully.
Common mistakes to avoid
This is a forgiving recipe, but a few things can make it harder than it needs to be.
Freezing the watermelon without wrapping it
Unwrapped watermelon can pick up freezer odors. It can also form a frosty layer that tastes flat. Wrap it well for the freshest flavor.
Carving the well too deep
A deep hole may leak or make the watermelon harder to scrape evenly. Keep the indentation shallow and centered.
Trying to scrape too soon
If the watermelon isn’t frozen solid, it won’t shave properly. Freeze it until it’s firm all the way through.
Waiting too long after thawing
A little softening is good. Too much melting turns the surface watery. Aim for slightly softened, not slushy.
Using the wrong spoon
This one matters most. A metal spoon is the key to the texture. It scrapes cleanly, handles pressure, and helps create those delicate frozen flakes.

How to store leftovers
This dessert tastes best right after scraping, but you can save leftovers.
Scrape the frozen watermelon and coconut milk mixture into a freezer-safe container. Cover it tightly and freeze. When you’re ready to eat, let it sit at room temperature until scoopable, then scrape or stir it again with a metal spoon.
The texture may be a little firmer the second time, but it still makes a great cold snack.
If you haven’t scraped the watermelon yet, you can keep the wrapped frozen half in the freezer for a few days. For the freshest flavor, enjoy it sooner rather than later.
Make it once, then make it your summer habit
Once you try this, you’ll start looking at watermelon differently. It’s not just something to slice into wedges. It can be the bowl, the base, and the frozen dessert all at once.
Here’s the whole flow again:
Cut the watermelon in half crosswise.
Carve a shallow indentation in one half.
Pour in coconut milk.
Wrap and freeze until solid.
Let it soften slightly at room temperature.
Set it in a bowl and scrape with a metal spoon.
That’s all it takes.
If you’re filling your summer with easy fruit ideas, you might also like this guide to blueberries as a summer superfood.
The sign that you nailed it is simple. Your spoon should pull up frosty pink shavings that melt into creamy coconut milk, and the watermelon half should look like the happiest dessert bowl on the table. Grab a towel, steady it in a bowl, and scrape away.


Comments